Top Tips to power up your Express.js backend
Backend is most important part of your web app. These tips help you make it stronger in terms of features, performance, and scalability.

Backend is one of the most important part of any modern web app. There are many awesome frameworks but Express.js is my favorite.
In this write up I'll present some very important tips to power up your Express.js backend. These tips work for all other backend's also just the implementation changes.
Express.js is one of the most popular JavaScript Framework for backend. It is very flexible but you need to setup few things for any non-trivial web app. Here is the list.
Environment variables
Express.js doesn't provide support for environment variables out of the box. I recommend using dotenv package for this purpose.
Simply include the following 2 lines before initializing the express.js server.
const dotenv = require('dotenv')
dotenv.config()
Next create .env file in the root of the project.
e.g. We want to add database URL to .env
DATABASE_URL=mongodb://localhost/ecommerce
This can be accessed from the code using process.env object.
const dbURL = process.env.DATABASE_URL
Now you can use it anywhere.
Request Validator
Input validation is one of the most common requirement for any web backend.
For express you can use joi package.
joi package allows validating an object against Joi schema using Joi.validate function.
The target object for our case is Express.js req.body or req.query.
const schema = Joi.object().keys({
    marks: Joi.number().min(0).max(100),
    name: Joi.string()
});

const requestBody = req.body

const validationResult = schema.validate(requestBody)

if (validationResult.error){
    //validation failed
}else{
    //input data is valid
}
You can easily refactor this code to separate middleware.
Access Control
Access control system is very important in multi-role system. You may need to allow REST API access to users based on roles.
For example,
- user can access only his blog posts (related end points)
- moderator can access read and delete all blog posts, but cannot deactivate users
- admin can see all users, deactivate users in addition to everything which moderator can do.
This can be implementated using accesscontrol npm package. Here is how you do it.
const AccessControl = require('accesscontrol')
const accessControl = new AccessControl()

//Creation of access control policy
  accessControl
        .grant('user')
        .createOwn('profile')
        .updateOwn('profile')
        .readOwn('profile')
        .deleteOwn('profile')

// middleware to check if given role has permission to access given endpoint

function(req,res,next) {
    const permission = accessControl.permission({
        role: req.user.role,
        resource, //profile
        action, //read:own
    })
    if (permission.granted) {
        next() //access granted
    } else {
        //return error
        res.status(403).json({
            error: true,
            message: 'Unauthorized Access',
        })
    }
}
Again this can be refactored to common middleware which can be used in all the REST Endpoints of your Express.js App.
Bcrypt the passwords and important information
Never store sensitive information like passwords as a plain text in your database. Node.js provides bcrypt package to encrypt and verify the information like passwords.
Here is a way to encrypt the password (or other sensitive information) in your database
const password = req.body.password
const saltingRounds = 10
const bcrypt = require('bcrypt')
let hashedPassword = bcrypt.hashSync(password, saltingRounds)
// save the hashedPassword
Verify if the password is correct
const isCorrectPassword = bcrypt.compareSync(inputPassword, storedHashedPassword)
if (isCorrectPassword){
    //correct password
}
You can also use this for other use-cases like storing digital PINs.
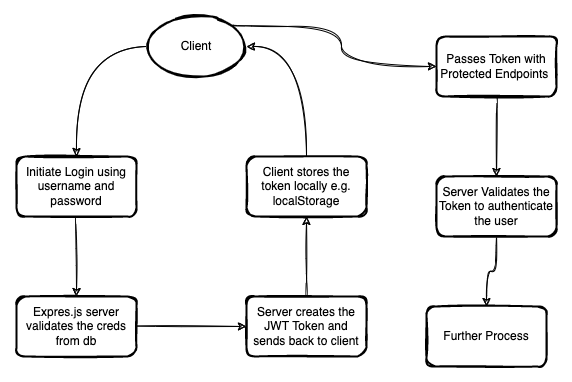
JSON Web Tokens
JSON Web Tokens aka JWT is a secure way of transferring the information between parties (generally server and client)
Let me explain in easier language.
- Client requests to login by passing user name and password. Your express app will validate that from the database.
- If credentials are valid, then it will generate a JWT token using some basic identification information of the user (generally unique user id and user name or user role). You
- This information will be encrypted in JSON format, signed using the
JWT Secretand sent back to the client. - Client can pass this token later in other api calls to identify itself.
- When client passes a token, it claims to be a particular user. Your Express Server should be able to validate the token and allow the further operation.
Here is a quick illustration
Here is how you do it in express.js app.
In order to generate token.
const jwt = require('jsonwebtoken')
generateToken(user) {
        let opts = {}
        //options can identify the issuer and expiry time for the token
        opts.issuer = config.jwt.issuer
        opts.audience = config.jwt.audience
        opts.expiresIn = 60 * 60;

        return jwt.sign(user, config.jwt.secret, opts) //information in user object is encrypted in the token which can be used later
}
Important JWT Secret should never be made public or committed to any VCS like GitHub, Bitbucket or similar.
To Decode the information back, use jwt.decode function.
const decoded = jwt.verify(token, config.jwt.secret);
It will throw an error if token is invalid or secret is wrong.
CORS
Not everybody in the world should be able to access your REST endpoints. You need to limit them by origins. cors package allows you to define which origins can access your Express.js endpoints.
Here is how you allow only limited origins to access express.js routes.
    const cors = require('cors')
    const whitelist = [
        'https://appsyoda.com',
        'https://www.appsyoda.dev'
    ]
    let corsOptionsDelegate = function (req, callback) {
        let corsOptions
        if (whitelist.indexOf(req.header('Origin')) !== -1) {
            corsOptions = {
                origin: true,
            } // reflect (enable) the requested origin in the CORS response
        } else {
            corsOptions = {
                origin: false,
            } // disable CORS for this request
        }
        callback(null, corsOptions) // callback expects two parameters: error and options
    }
    app.use(cors(corsOptionsDelegate)) // app is express app object
Now if any other service or client tries to access your app, other than whitelisted ones, they will get the CORS error.
Helmet
helmet is a security package that can be used as a middleware in your express app. It sets various http headers on each request.
It's very simple to use.
const helmet = require('helmet')
app.use(helmet())
It helps but it is not the silver-bullet for your app security.
File upload to Amazon S3
Any non-trivial web app would need file upload functionality. Amazon S3 is among the best cloud services for managing files on cloud.
For Express.js app, you need 3 packages multer, multer-s3 and amazon-sdk
Here is the snippet for That
const config = require('../../config'),
    multer = require('multer'),
    multerS3 = require('multer-s3'),
    AWS = require('aws-sdk')

AWS.config.update({
    accessKeyId: config.s3.accessKey,
    secretAccessKey: config.s3.secretKey,
})

const s3 = new AWS.S3({
    region: config.s3.region,
    s3_signature_version: config.s3.s3_signature_version,
    bucket: config.s3.bucketName,
})

// file upload code using s3 and multer

let uploadFile = multer({
    storage: multerS3({
        s3: s3,
        bucket: config.s3.bucketName,
        key: function (req, file, cb) {
            cb(null, Date.now() + '-' + file.originalname)
        },
    }),
}).array('file', 1)

//uploadFile can be now used as middleware in any of the Express Routes.

router.post('/profile-pic', authenticate, uploadFile, UserController.updateProfilePic)
It can be modified to accept multiple files as well.
NodeMailer
Sending emails is a very basic function of any backend server. You may need to send transactional emails to your clients or you may need to send operational emails to your system admin.
nodemailer allows you to send email from your Node.js server. You can configure it using SMTP credentials
First you need to configure the transporter object using SMTP credentials like this.
const nodemailer = require('nodemailer')
const config = require('../config') //setup using .env (dotenv)
const fromEmail = config.email.defaultFrom

let transporter = nodemailer.createTransport({
    host: config.email.host,
    port: config.email.port,
    secure: true, // secure:true for port 465, secure:false for port 587
    auth: {
        user: config.email.username,
        pass: config.email.password,
    },
})
Then this transporter object can be used to send emails. Here is an example
async sendEmail(toEmail, emailSubject, emailText) {
        let info = await transporter.sendMail({
            from: fromEmail, // sender address
            to: toEmail, // list of receivers
            subject: emailSubject, // Subject line
            html: emailText, // text body
        })
        return info
}
This function can be exported from a common service file and used anywhere in your app.
TDD Setup
This is very important. You need a way to automatically test important parts of your application with some testing framework.
Generally there are 2 parts to it.
Testing framework like mocha
As the name suggests, you need a framework / library to be able to write tests in your backend app.
mocha is very versatile yet easy to use framework which is widely used with Node.js apps for writing the specs.
Mocha provides describe and it. describe is the keyword to signify which module is under test. it tells the mocha framework that it is individual test.
Here is a quick example
describe("Product Management", function () {

    describe("Create Product", function () {
        it("creates product with valid data", function () {
        });
        it("returns error with invalid data", function () {
        });
    });

    it("Delete Product", function () {
    });
});
It also provides reporting options and parallelization of tests.
Assertion Library like chai
It is a library which allows us to write assert statements. These are elemental to any testing framework.
I recommend chai assertion library to be used with Express.js. Refer official documentation for learning more about it.
Here is a simplest example of chai test
const expect = require('chai').expect
const request = require('request')
const baseURL = 'http://api.appsyoda.com/' // change it to your actual base URL

describe('Check App Status', function () {
    it('Returns Status 200', function (done) {
        let url = baseURL
        request(url, function (error, response, body) {
            expect(response.statusCode).to.equal(200) //assert statement
            done()
        })
    })
})
Above snippet makes an HTTP request to baseURL and asserts 200 status code using chai.
Faker
Faker is the library which allows you to create contextual fake data. Here is an example to generate user name, email and number.
const firstName = faker.name.firstName()
const lastName = faker.name.lastName()
const email = faker.internet.email(firstName, lastName)
const phone = faker.phone.phoneNumberFormat()
//use this to test sign-up endpoint
You can use it in combination with test frameworks.
Conclusion
There are lot of other things which you can do. I have touched the basics and most important aspects. For sure, we can dig deep in each of the aspect as well. Write me back for any questions.

WRITTEN BY
Mohit Sehgal
Want to positively impact the world. Building Tech Startups. Tech Consultant. Engineering Lead.